How to Record Screen with Internal Audio on Mac?

What is meant by Screen Recording?
In simple words, screen recording is the digital recording of computer screen output. It certainly helps you to record any video which can’t be downloaded or in the making of ay sort of tutorial.
Screen Recording on Mac:
You ever experience how is it like to see any video without audio. Well, it can be annoying as it is difficult to figure out things just by seeing visuals. The screenshot feature is present in every smartphone and PC. But the screen recording is one of the features which is not present in most of the devices and requires third-party apps. However, in Mac operating systems there is a built-in ‘Quick Time Player’ that enables you to record your screen activity. It is an excellent feature but there is a slight loophole in it as the QuickTime Player can’t record the internal audio of your making while screen recording. For example, if you are watching a live show and recording it with quick time player, it will only capture the screen visuals but not the audio. So in this article, I am going to tell you how to record screen with internal audio on Mac.
How to Record Screen with Internal Audio on Mac?
We will need a third-party plugin to record screen with Internal Audio on Mac. So we will be telling you about two plugins, one for the old mac users and one for the new Mac users.
For Old Mac Users:
- First, you need to download Soundflower from this link and install it similar to any third-party app.
- After that, launch the “Audio MIDI setup” on your Macbook and tap “+” to create an “Aggregate Device” and change its name to “Internal Input”.
- Afterwards, tap on the checkboxes on the left for “soundflower 2ch” and “built-in microphone” to select them.
- Tap on the “+” sign again to form a “Multi-Output Device” and change its name to “Internal audio rec”.

- Now again tap on the checkboxes on the left of “built-in output” and “soundflower 2ch” to select them as shown in the above-mentioned image.
- Now you need to close the window and tap on the volume icon on the status bar and choose “Internal audio rec”.
- Launch the Quick Time Player and prior to recording your screen, select sound source as “Internal input” and start the screen recording with internal audio on Mac.
Point to Remember:
You should switch back to “headphones” or “speakers” once you are done with the screen recording.
For New Mac Users:
- First of all, Download and install the blackhole plugin. You will need to set it up by registering your email, name etc. Its completely free of cost but you just need to subscribe it before installing. Still, if you face any issue in installing the plugin, you need to visit the System Preferences and then Security & Privacy. From that menu, unlock the Security & Privacy preferences by tapping on the lock icon present at the bottom left.

Change Settings on Audio Midi Setup:
After setting up the Blackhole plugin, now you will have to configure settings on Audio Midi Setup.
- First, launch the audio midi setup from spotlight search.
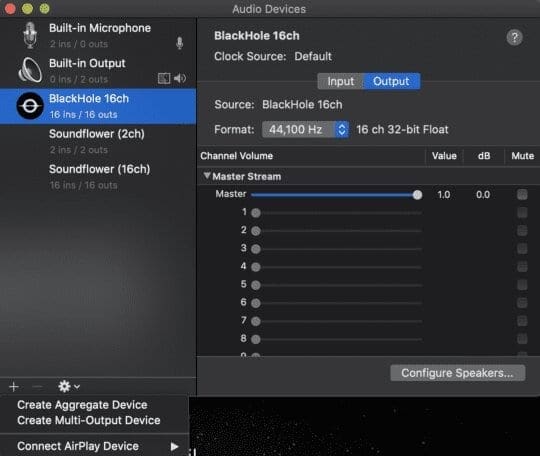
- Now if the BlackHole plugin is properly installed, there would be a“BlackHole 16ch” option present on the sidebar on the left as you can see in the image.
- Now tap on + sign present at the bottom, and from the slide down list, select Create Aggregate Device.
- By selecting, it will create another “Aggregate Device” which will appear on the sidebar. For feasibility, you can change the name of the option to “QuickTime Input”.
- Now the QuickTime Input option will be comprising of a list of audio devices with checkboxes alongside them. Now tap on the “BlackHole 16ch” checkbox from the list to select it..
- Click on the + icon once more. This time, tap on ‘Create Multi-Output Device’.
- Now again rename the new option to “QuickTime Player Output.”
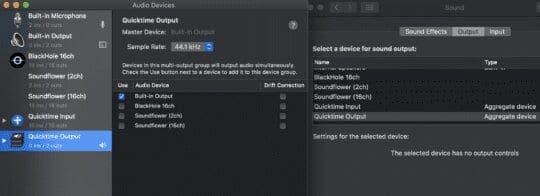
- Under QuickTime Player Output, tap on “BlackHole 16ch” checkbox from the list of audio devices. In addition to that, you must also make sure that “built-in output” is also allowed from the system so you can also hear the audio coming from the Mac while recording any video.
- Finally, visit the System Preferences > Sound and click on the Output tab. From the output list, choose the QuickTime Output as shown in the image.
After doing that, you are ready to record screen with Internal Audio on Mac.
Enjoy Screen Recording with Internal Audio on Mac:
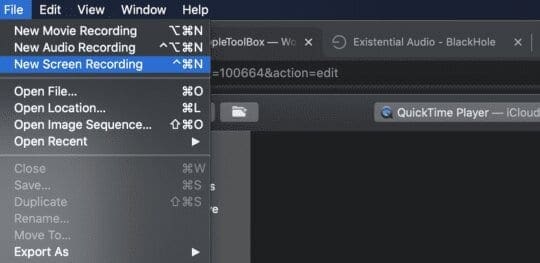
- Launch the QuickTime Player. For latest MacOS, you can do it by tapping on the File tab at the top-left corner of the screen, and from the slide down list, choose New Screen Recording as shown in the image.
- Now, the QuickTime Player toolbar would appear at the corner of the screen. From there, click on options.
- Under Microphone, the QuickTime Input option must be selected.
- For experiment, open up any YouTube video. Now click on Record from QuickTime Player toolbar from the corner of the screen and play the video.
- Once you are done with the screen recording, you’ll notice that QuickTime Player allows you to record screen on Mac with internal audio.
Point to Remember:
You should change the output device under System Preferences > Sound > Output to the built-in or default option once you’re done with the screen recording activity. And if you face any problem, restart your Macbook, as some initialization processes might be required for the plugin to work properly.
Check out? How To Repost On Instagram? 2 Ways to Regram on Instagram
PTA Taxes Portal
Find PTA Taxes on All Phones on a Single Page using the PhoneWorld PTA Taxes Portal
Explore NowFollow us on Google News!